
Blogs
How to Export MP4 from DaVinci Resolve
Are you new to video editing? One of the first questions you might ask is, “How do I export video from DaVinci Resolve?”
We’ll go over each step in detail. You’ll also get:
- A quick export method that works for social media.
- Fixes for the most common “can’t export MP4” problems.
- Other formats DaVinci Resolve can export if you need ProRes, DNx, or image sequences.
How to Export MP4 From DaVinci Resolve
Follow these steps for the free or Studio versions of DaVinci Resolve.
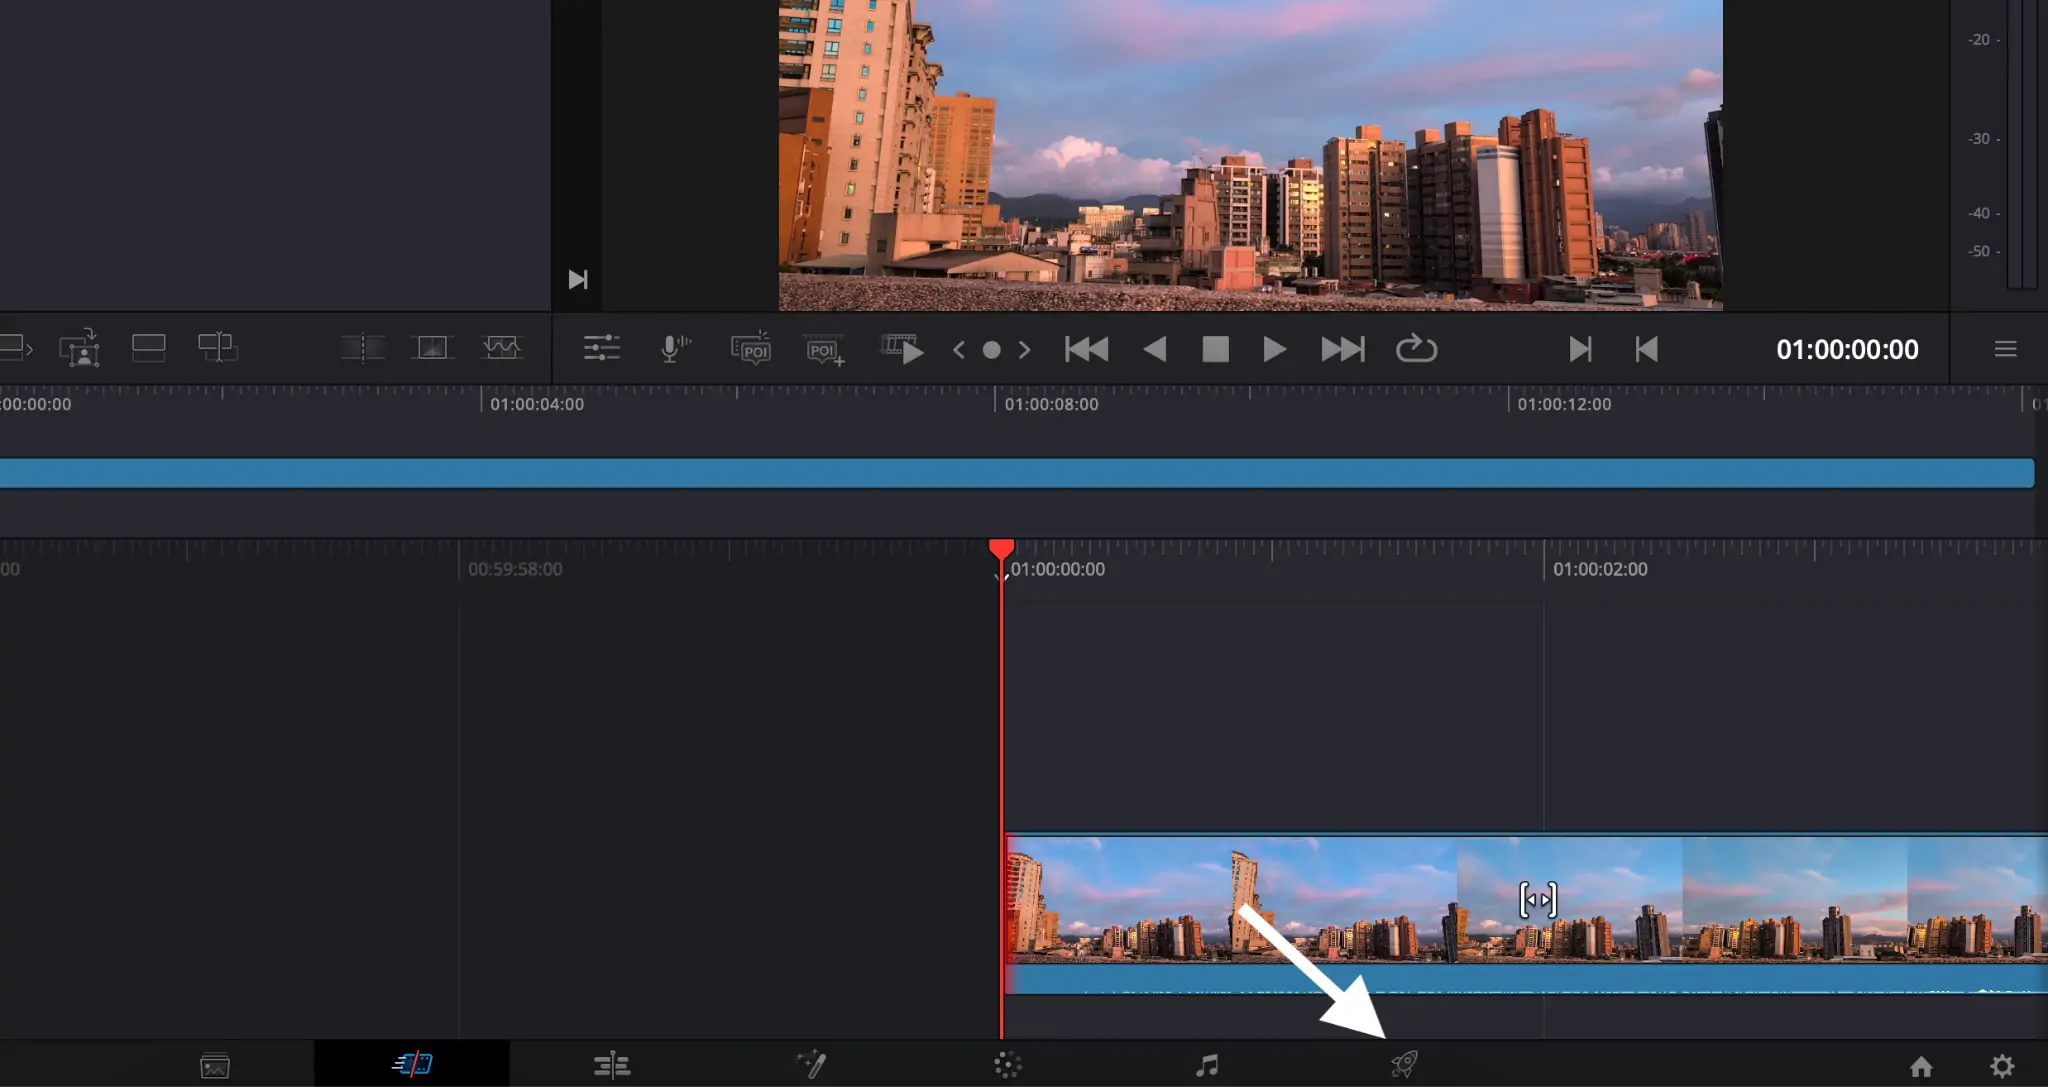
- Open the Deliver page
Click the rocket icon at the bottom to open the Deliver page, where exporting takes place.
- Choose a render preset
Use the default Custom Export for control over resolution, frame rate, and bitrate.
Tip: Make sure Single Clip is set, so that your entire timeline exports as a single video. In case you need to deliver raw material to an editor or VFX artist, choose Individual Clips.

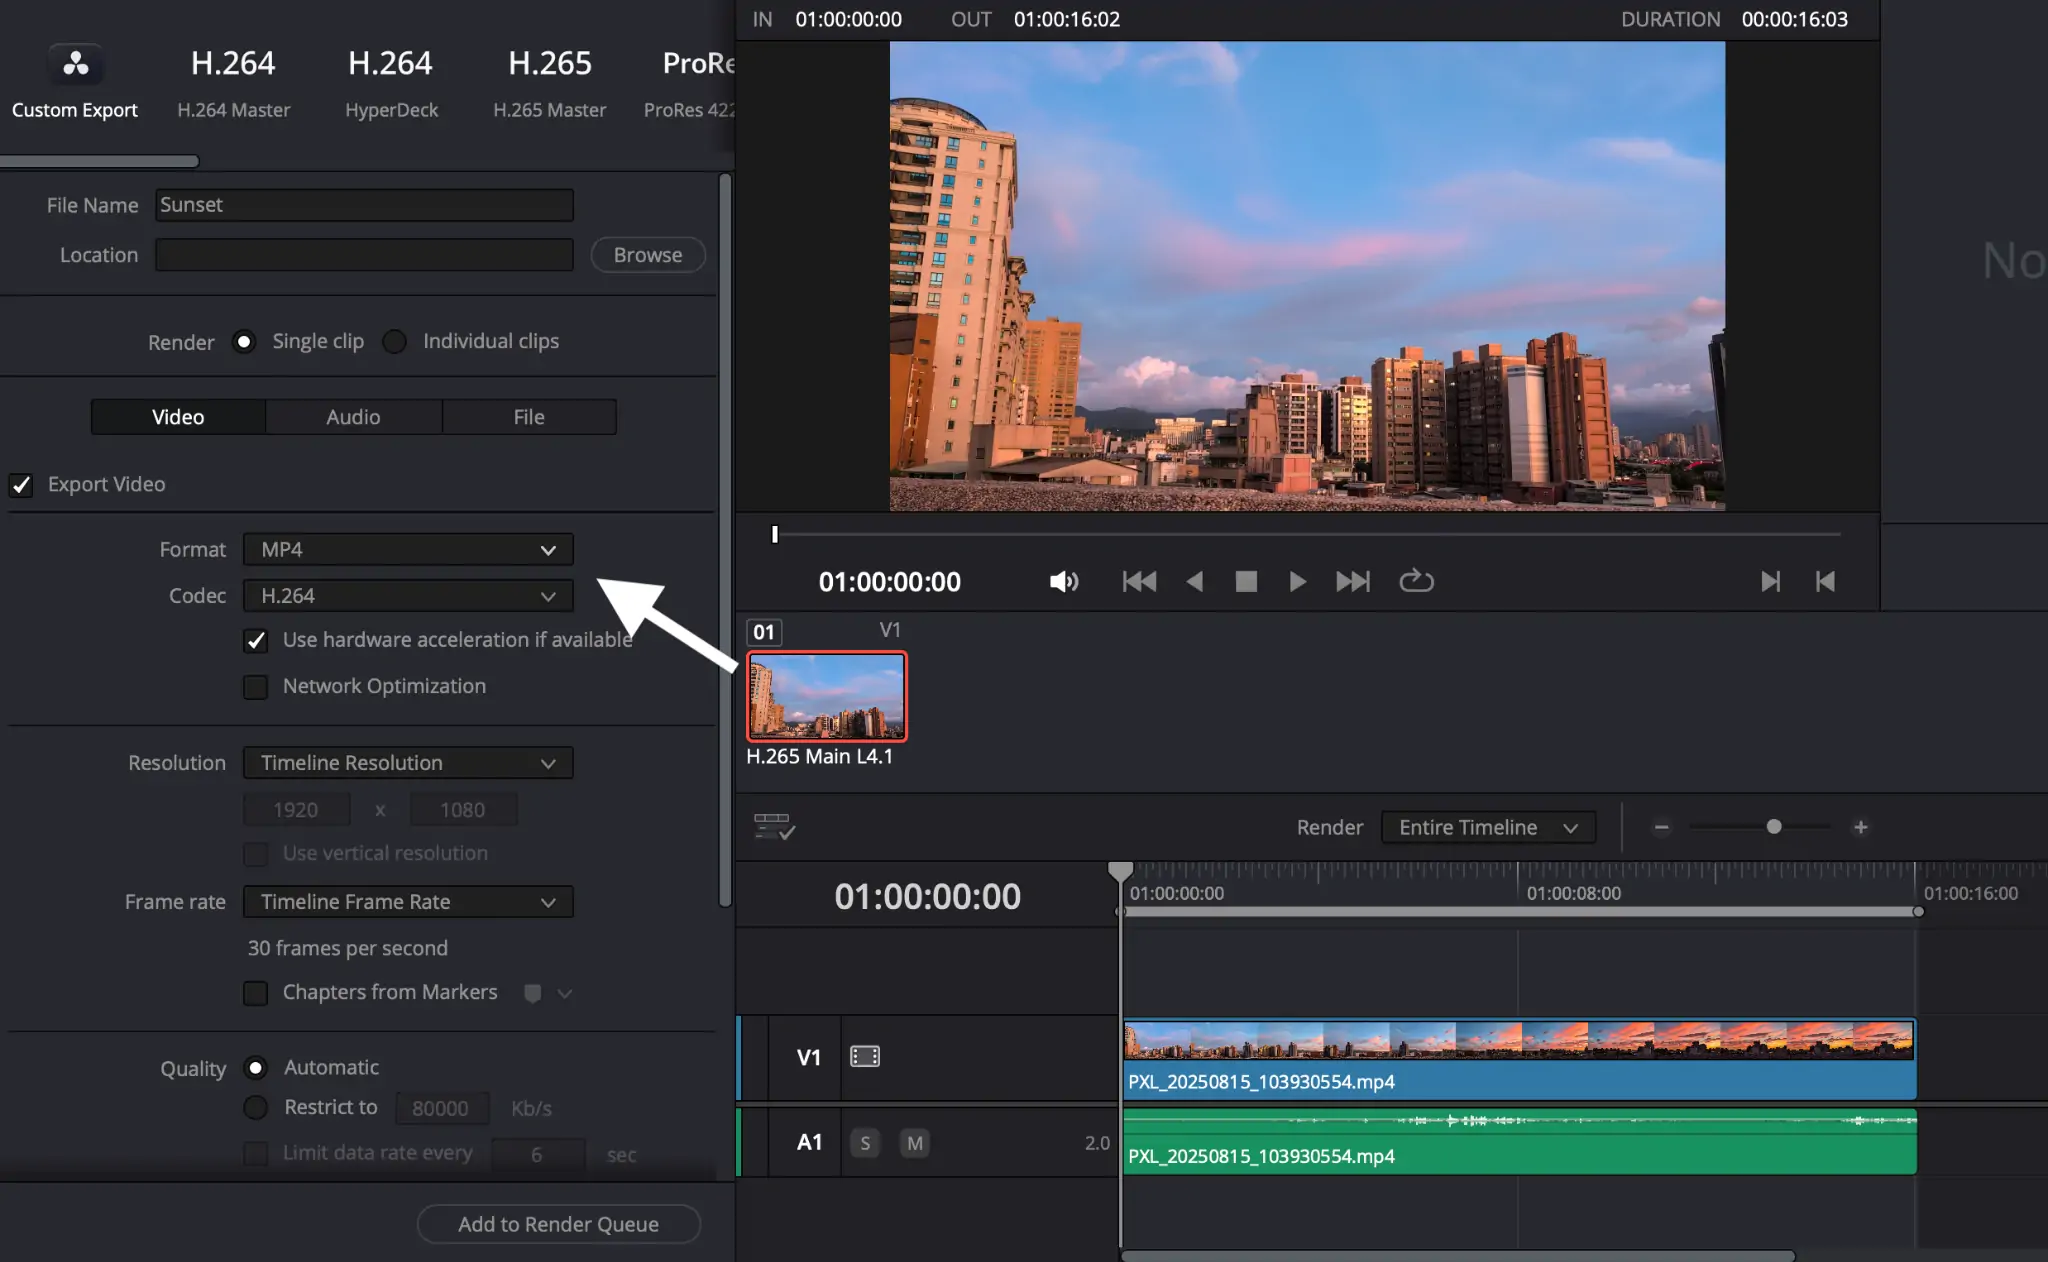
- Set the format
Choosing MP4 will export the file in MP4 format within DaVinci Resolve. Doing so is faster, but can be buggy.
For better results, use the QuickTime format first. You can convert to MP4 using AhaConvert for the best quality and full compatibility.
- Set the Codec
Selecting H.264 will get you the best compatibility. For smaller files, choose H.265.
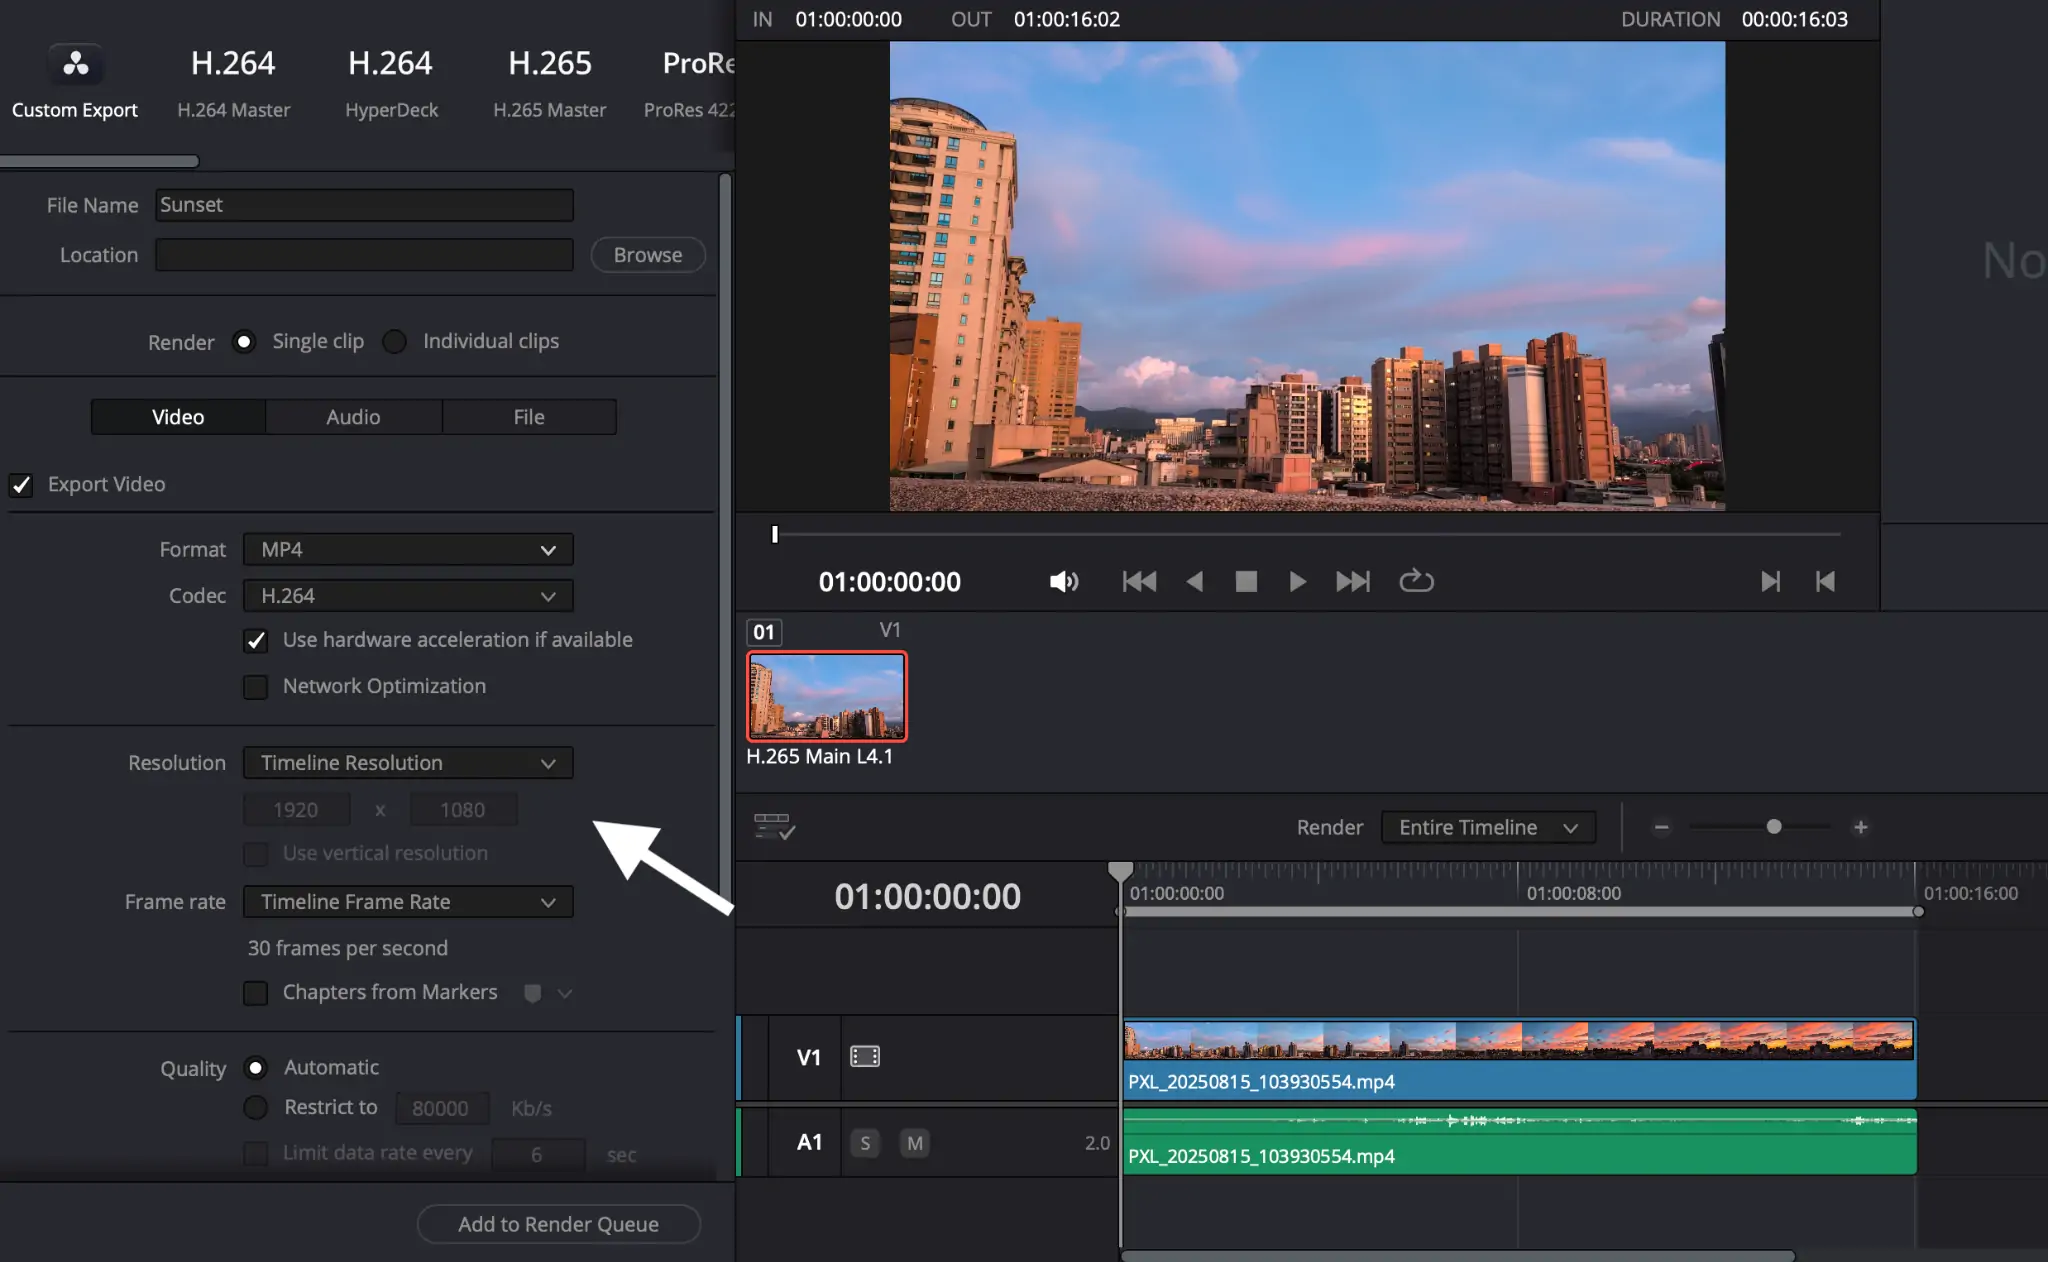
5. Customize your video settings
Resolution: Match your timeline (e.g., 1920×1080 for Full HD, 3840×2160 for 4K).
Frame rate: Match your timeline frame rate (e.g., 24, 25, 30, or 60).
Quality / Rate control:
Keep the default Automatic option for simplicity and excellent quality. Or select Restrict and type in your preferred Kb/s. As a rule of thumb, it should be equal to the fps multiplied by 2000. For example:
- 24 fps: 48000 Kb/s
- 30 fps: 60000 Kb/s
- 60 fps: 120000 Kb/s
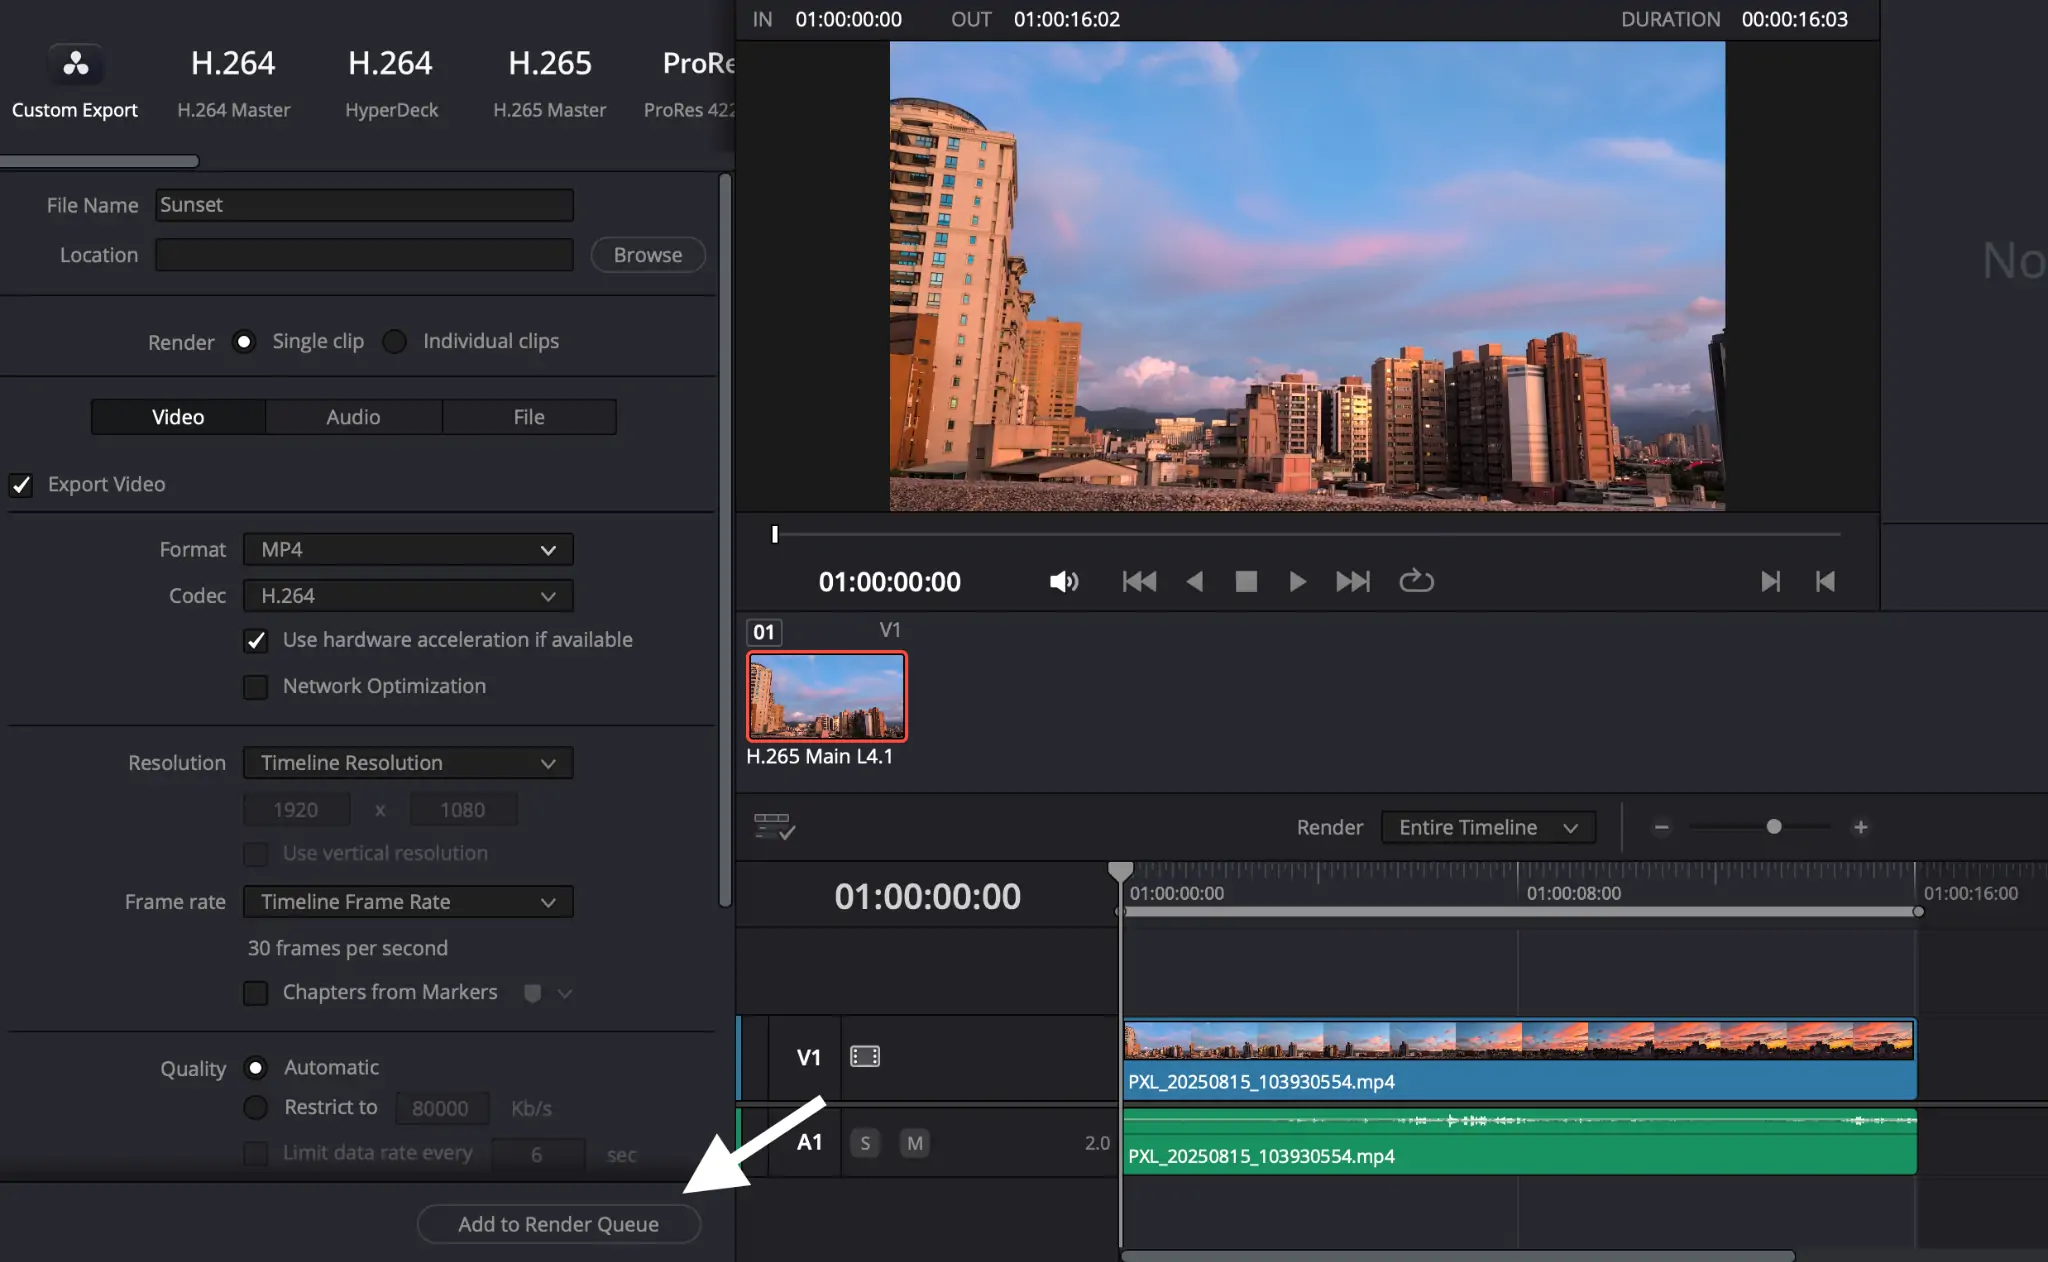
- Add to Render Queue
Click Add to Render Queue (right panel). Type in a file name and select a folder for upload if you haven’t done so already.
Your job will appear in the Render Queue on the right side.
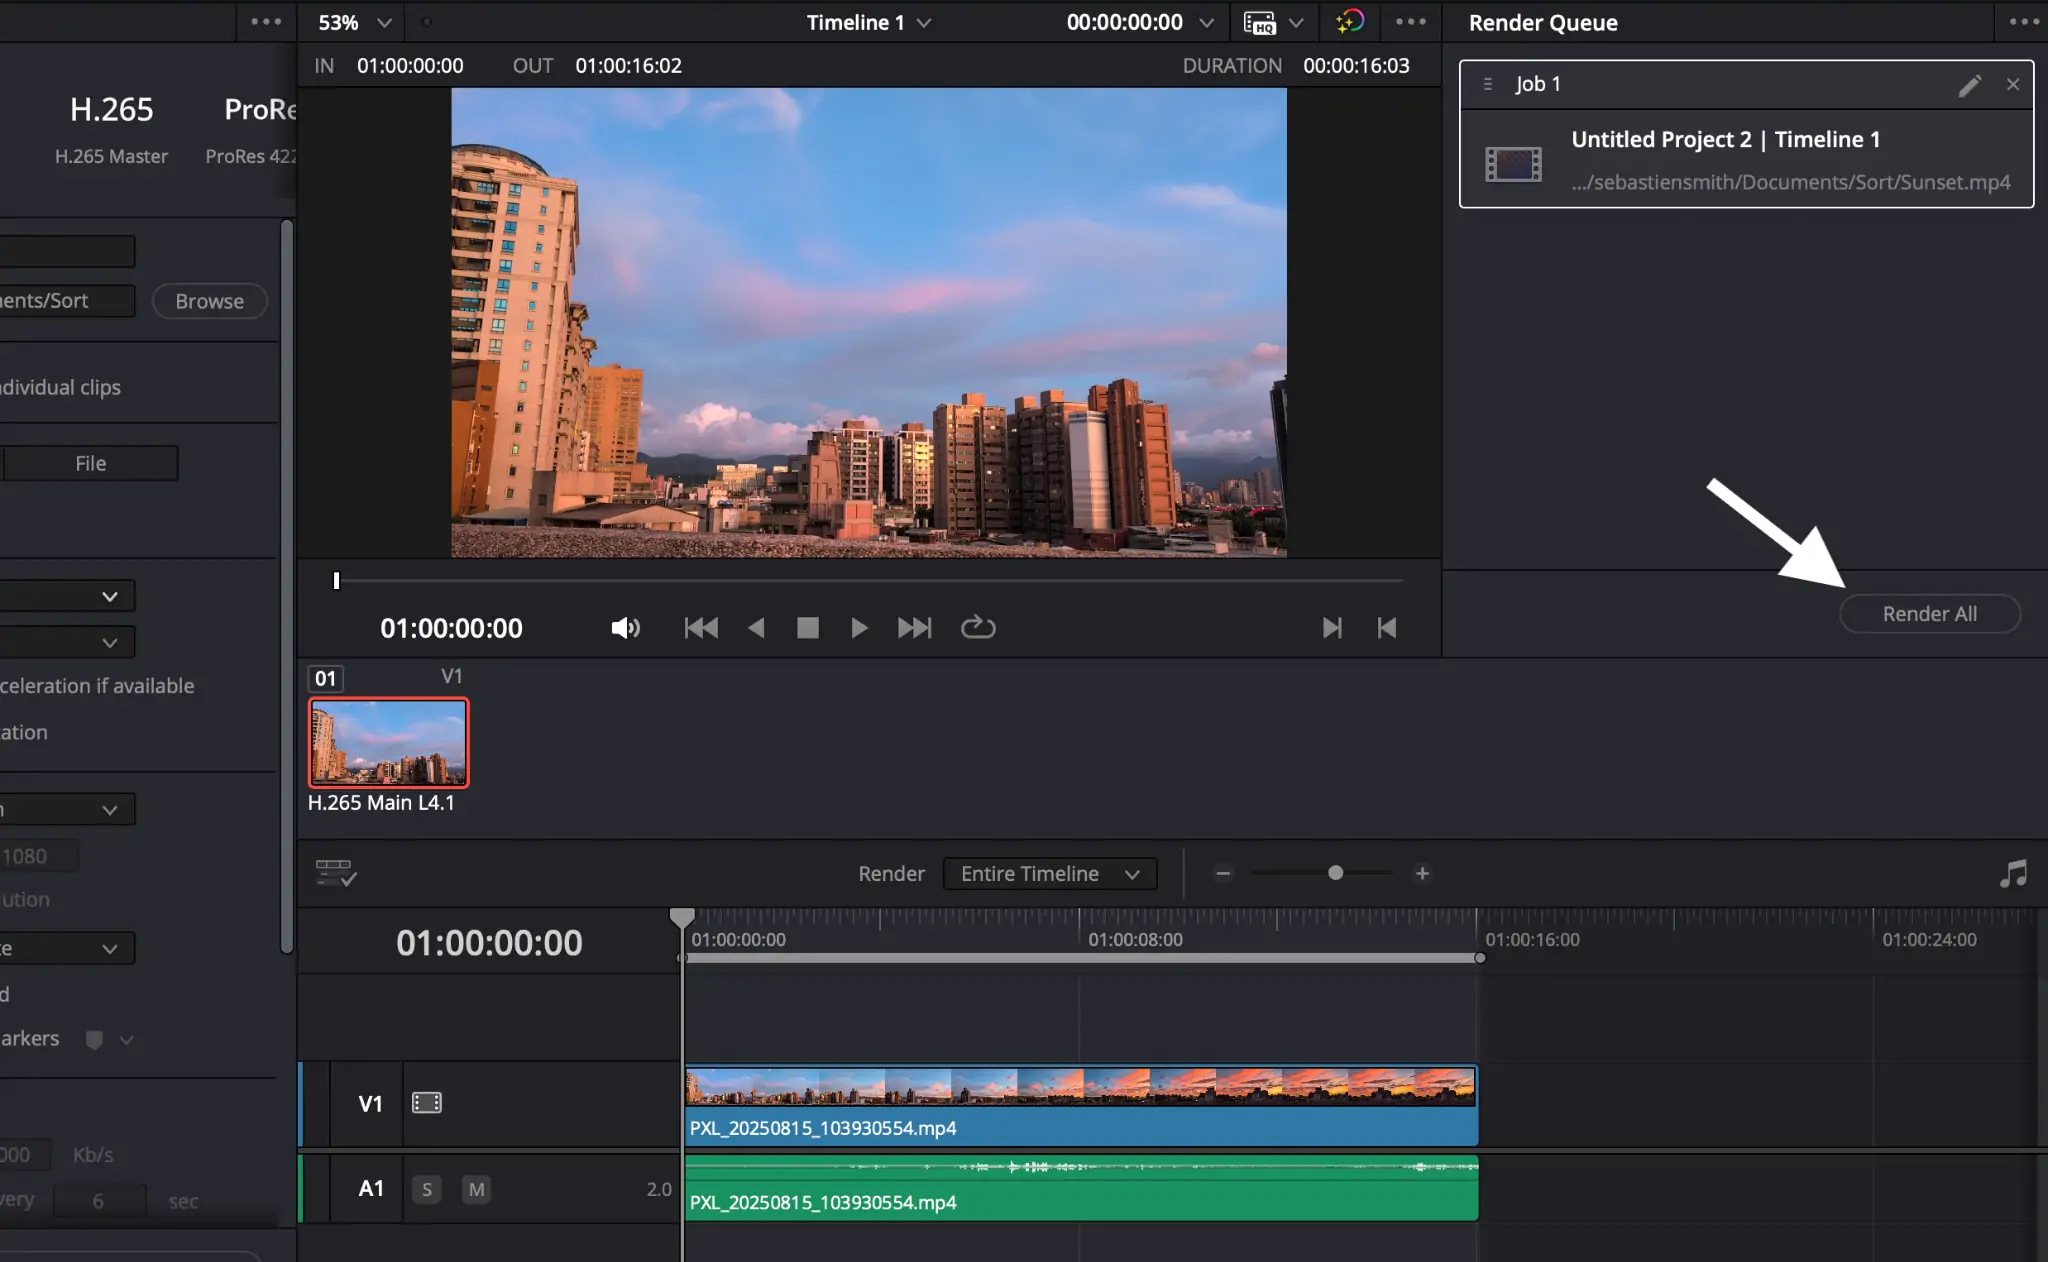
- Render and finish
Click Render All to create your video file in the chosen folder. And you’re done!
How to Export MP4 From DaVinci Resolve for Social Media
- Go to File > Quick Export(or use the Quick Export icon in the top-right).
- Select 264 MP4 or YouTube as the render preset.
- Choose resolution, quality, location, and export.
How to Fix “DaVinci Resolve Can’t Export MP4” Issue
If Resolve won’t read or write MP4, go through this troubleshooting checklist:
Confirm the render settings
- Format = MP4, Codec = H.264(or H.265).
- Audio Codec = AAC(MP4 won’t accept PCM).
- Turn Export Alpha off (MP4 has no alpha).
- Ensure Frame rate and Resolution are supported by your chosen codec/encoder.
Try hardware vs. software encoding
- In the Videotab, switch the Encoder from Hardware to Native/Software (or vice versa).
- Some GPUs/drivers can’t handle particular profiles. Switching often fixes “failed to encode” errors.
Update Resolve and your GPU drivers
- Install the latest DaVinci Resolve
- Update NVIDIA/AMD/Intel graphics drivers to the latest stable version.
Check edition & OS limitations
Some codecs/encoders are OS-dependent and/or Studio-only. If H.265 fails in Free, switch to H.264.
On certain Linux setups, H.264/H.265 encoding may face restrictions. Use H.264 on supported OS, or export to MOV/DNx and convert (see next tip).
Convert problem files before import/export
- Does your source footage use an unusual MP4 variant (e.g., variable frame rate, odd profile)? Transcode it to a Resolve-friendly format (e.g., DNxHR MOV) before editing.
- If the export continues to fail, try exporting to MOV (DNx/DNxHR)or 264 MOV. Next, convert that file to MP4 using a converter such as AhaConvert for a compatible .mp4 output.
What other formats does DaVinci Resolve export?
Resolve can export a wide range of professional formats:
- MOV (QuickTime container)
- ProRes– Commonly used on macOS and widely accepted.
- DNxHD/DNxHR– Great cross-platform intermediate codecs.
- 264/H.265– In a MOV container when needed.
- MXF
- Image Sequences: DPX, EXR, TIFF, PNG, JPEG(ideal for VFX pipelines or archival)
- Audio-only masters: WAV, AIFF (via the Audio-focused export or the Fairlight page)
Availability varies by operating system (Windows/macOS/Linux) and whether you’re using the Free or Studio versions. When in doubt, DNxHR (MOV or MXF) is a good choice. You can then convert to delivery formats (such as MP4) with a tool like AhaConvert.
Frequently Asked Questions
1. Does DaVinci Resolve support MP4?
Yes, DaVinci Resolve can import and export MP4 files. However, compatibility depends on the codec inside the MP4 container (H.264 and H.265 are most common). If your MP4 won’t import or export properly, converting it with a free tool like AhaConvert can fix the issue.
2. How to export video in DaVinci Resolve without losing quality?
Go to the Deliver tab > Custom Export. Select QuickTime as the format, set the codec to H.265 (or H.264), and ensure the resolution and frame rate match those of your original footage. Then select a high bitrate or use the “Restrict” option for more control. This ensures the closest possible match to your source.
3. How to import MP4 into DaVinci Resolve?
Drag and drop your MP4 file into the Media Pool. If Resolve can’t read the file, it’s likely because of an unsupported codec. In that case, convert the file to a compatible format like MP4 (H.264) or MOV using AhaConvert, then try again.
4. How to export a DaVinci Resolve project as MP4?
Open your project, go to the Deliver tab, and select Custom Export. Under Format, choose MP4, then pick H.264 or H.265 as the codec. Adjust resolution, frame rate, and quality as needed, then click Add to Render Queue and hit Render All. Your project will export as an MP4 file.
5. How to export a video from DaVinci Resolve to YouTube?
DaVinci Resolve has a YouTube preset under the Deliver tab. Select it, log in to your YouTube account, and adjust basic settings (title, description, resolution). If you prefer manual control, export the file as MP4 (H.264) first, then upload it directly to YouTube.
6. Why does my exported MP4 from DaVinci Resolve look washed out?
That’s usually because of a color-management/tagging mismatch. In Deliver > Advanced Settings, ensure your Color Space/Tags match your timeline (e.g., Rec. 709). Also, confirm your player isn’t applying extra tone mapping.
7. How do I export vertical MP4 for TikTok/Reels?
Set your Timeline Resolution to 1080×1920 (9:16), keep H.264 MP4, and export at 8–12 Mbps for 1080p vertical. Try Quick Export for fast social posts.
Finishing up
Knowing how to export MP4 in DaVinci Resolve will make you a video editing pro. Stay tuned for more tips on the AhaConvert blog. Happy exporting!